Here is a picture of the main application-window. The functionality is explained in the following.
openMosixview displays a row with a lamp, a button, a slider, a lcd-number, two progressbars and some labels for each cluster-member. The lights at the left are displaying the openMosix-Id and the status of the cluster-node. Red if down, green for avaiable.
If you click on a button displaying the ip-address of one node a configuration-dialog will pop up. It shows buttons to execute the most common used "mosctl"-commands. (described later in this HowTo) With the "speed-sliders" you can set the openMosix-speed for each host. The current speed is displayed by the lcd-number.
You can influence the load-balancing of the whole cluster by changing these values. Processes in a openMosix-Cluster are migrating easier to a node with more openMosix-speed than to nodes with less speed. Sure it is not the physically speed you can set but it is the speed openMosix "thinks" a node has. e.g. a cpu-intensive job on a cluster-node which speed is set to the lowest value of the whole cluster will search for a better processor for running on and migrate away easily.
The progressbars in the middle gives an overview of the load on each cluster-member. It displays in percent so it does not represent exactly the load written to the file /proc/hpc/nodes/x/load (by openMosix), but it should give an overview.
The next progressbar is for the used memory the nodes. It shows the currently used memory in percent from the avaiable memory on the hosts (the label to the right displays the avaiable mem). How many CPUs your cluster have is written in the box to the right. The first line of the main windows contains a configuration button for "all-nodes". You can configure all nodes in your cluster similar by this option.
How good the load-balancing works is displayed by the progressbar in the top left. 100% is very good and means that all nodes nearly have the same load.
Use the collector- and analyzer-menu to manage the openMosixcollector and open the openMosixanalyzer. This two parts of the openMosixview-application suite are usefull for getting an overview of your cluster during a longer period.
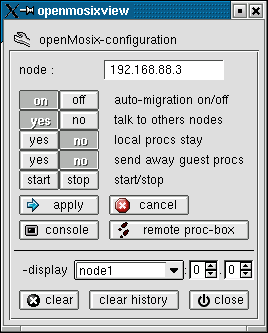
This dialog will popup if an "cluster-node"-button is clicked.
The openMosix-configuration of each host can be changed easily now. All commands will be executed per "rsh" or "ssh" on the remote hosts (even on the local node) so "root" has to "rsh" (or "ssh") to each host in the cluster without prompting for a password (it is well described in a beowulf documentation or on the HowTo's on this page how to configure it).
The commands are:
automigration on/off quiet yes/no bring/lstay yes/no exspel yes/no openMosix start/stop |
If you are logged on your cluster from a remote workstation insert your local hostname in the edit-box below the "remote proc-box". Then openMosixprocs will be displayed on your workstation and not on the cluster-member you are logged on. (maybe you have to set "xhost +clusternode" on your workstation). There is a history in the combo-box so you have to write the hostname only once.
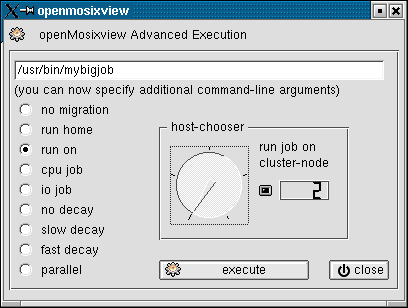
If you want to start jobs on your cluster the "advanced execution"-dialog may help you.
Choose a program to start with the "run-prog" button (fileopen-icon) and you can specify how and where the job is started by this execution-dialog. There are several options to explain.
You can specify additional commandline-arguments in the lineedit-widget on top of the window.
Table 12-1. how to start
-no migration | start a local job which won't migrate |
-run home | start a local job |
-run on | start a job on the node you can choose with the "host-chooser" |
-cpu job | start a computation intensive job on a node (host-chooser) |
-io job | start a io intensive job on a node (host-chooser) |
-no decay | start a job with no decay (host-chooser) |
-slow decay | start a job with slow decay (host-chooser) |
-fast decay | start a job with fast decay (host-chooser) |
-parallel | start a job parallel on some or all node (special host-chooser) |
For all jobs you start non-local simple choose a host with the dial-widget. The openMosix-id of the node is also displayed by a lcd-number. Then click execute to start the job.
You can set the first and last node with 2 spinboxes. Then the command will be executed an all nodes from the first node to the last node. You can also inverse this option.
Закладки на сайте Проследить за страницей |
Created 1996-2024 by Maxim Chirkov Добавить, Поддержать, Вебмастеру |